![How to Fix YouTube There Was A Problem In The Server [400] Error?](https://www.hatauzmani.com/uploads/images/202403/image_380x226_65f1745c66570.jpg)


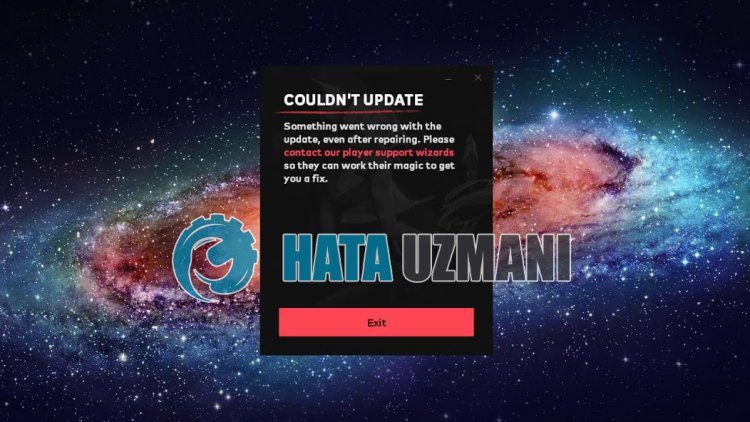
How To Fix Valorant Couldn't Update Error?
In this article, we will try to resolve the "Couldn't update Valorant" error that Valorant players encounter when trying to run the game.

Valorantplayers encounter the error "Could not update Valorant" when they want to run the game,and theiraccess to the game is restricted. If youare facing suchaproblem, you can findasolutionby following the suggestionsbelow.
What is Valorant Couldn't Update Error?
This error is usually causedbyanyantivirus systemblocking the game. Of course, we may encounter suchan error not onlybecause of thisproblem,butalsobecause of manyproblems. Possible reasons for encountering the Valorant update failed error canbelistedas follows:
- Antivirus maybeblocking the system.
- You may notbe installing toalocal disk.
- The Riot Clientprogram may notbe runningasanadministrator.
- Anyapplication running in thebackground maybeblocking the installation of the vgc service.
- VGC may notbe workingproperly.
Thepossible reasonslistedabove may cause us to encounter suchproblems. For this, we will try to solve theproblemby telling youafew suggestions.
How To Fix Valorant Couldn't Update Error?
To fix this error, you can find the solution to theproblemby following the suggestionsbelow.
1-) Turn off Antivirus Program
Disableanyantivirusprogram you use, or delete it completely from your computer. If youare using Windows Defender, disable it. For this;
- Type "virusand threatprotection" into the start search screenand open it.
- Then click on "Manage settings".
- Turn Real-timeprotection to "Off".
After this, let's turn off other ransomwareprotection.
- Open the start search screen.
- Open the search screenby typing Windows security settings.
- Click on the Virusand Threat Protection option on the screen that opens.
- Click on the Ransomware Protection option in the menu.
- Turn off Controlled Folder Access on the screen that opens.
After thisprocess, you can run the Riot Clientprogramand check if theproblempersists.
2-) Run Riot Client Applicationas Administrator
If the Riot Clientapplication is not runningasanadministrator, certain files may notbeallowed tobe uploaded. For this, run the task managerand terminate the task ofallprograms running in thebackground of the Valorant game. Then run the Riot Clientprogramasanadministratorand check if theproblempersists.
3-) There maybeaprogramblocking the installation in thebackground
Before running the Riot Clientprogram, run the task manager to close unnecessaryapplications running in thebackground. This willallow us to check whether unnecessaryapplications running in thebackgroundareblocking the installation file.
4-) Turn Off Unnecessary Services
Unnecessary services running in thebackground may notallow theapplication to run. For this, we can eliminate theproblemby disabling the services.
- Type "msconfig" into the start search screenand open it.
- Select "Services" on the screen that opens.
- Check "Hide All Microsoft Services"below.
- Then uncheck the serviceslistedand click the "Apply"button.
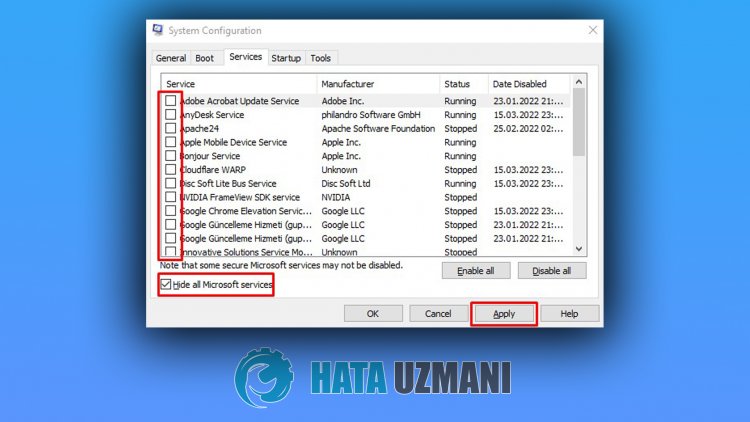
After thisprocess, restart the computerand check if theproblempersists. If theproblem is solved, you canactivate the services oneby oneand get informationabout which service is causing thisproblem.
5-) Turn off Driver Signature
We canprevent such errorsby turning off Windows 10 driver signatureand kernel debugging.
- Type cmd in the start search screenand run itas administrator
- Type the following code snippet on the commandprompt screen that opensandpress enter.
- bcdedit -set TESTSIGNING OFF
- bcdedit -set NOINTEGRITYCHECKS OFF
- bcdedit -set DEBUG OFF
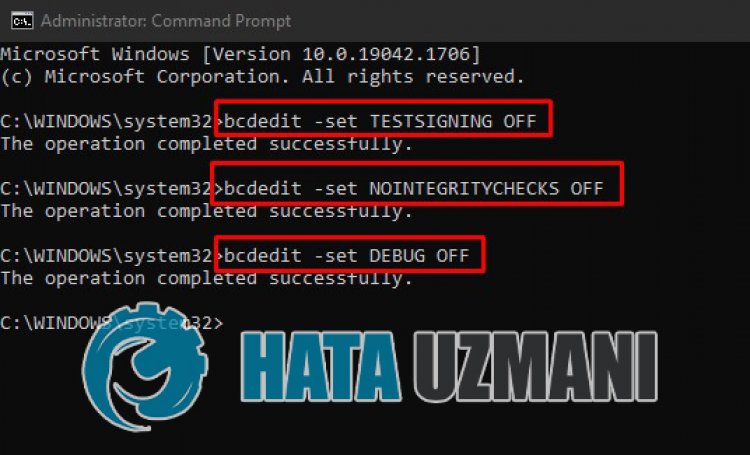
After theprocess is successfullyapplied, we can restart the computerand run Fall Guys comfortably.
6-) Reinstall VGC Service
Afterperforming theabove operation, we will need to reinstall the vgc service.
- First, let'saccess the Riot Vanguard file. For this, let'saccess the file "C:\Program Files\Riot Vanguard". (The fileaccess of your Fix game mustalsobe in the C:\ folder.)
- Let's open the "uninstall.exe"program in the folderandperform the deletion.(Let's say yes to the warning thatappears.)
- After the Vanguard system is deleted, VALORANT>let's run our game.
- Launcher will scan for missing filesand reinstalland reinstall vgc in services state.
- After the scan is ready, let's restart the computer.
- After restarting the computer, type "Services" in the start search screen.
- In the Services window that opens, we find the vgc serviceand double-click it.
- We will need to start the service stateby changing the startup type to Automatic.
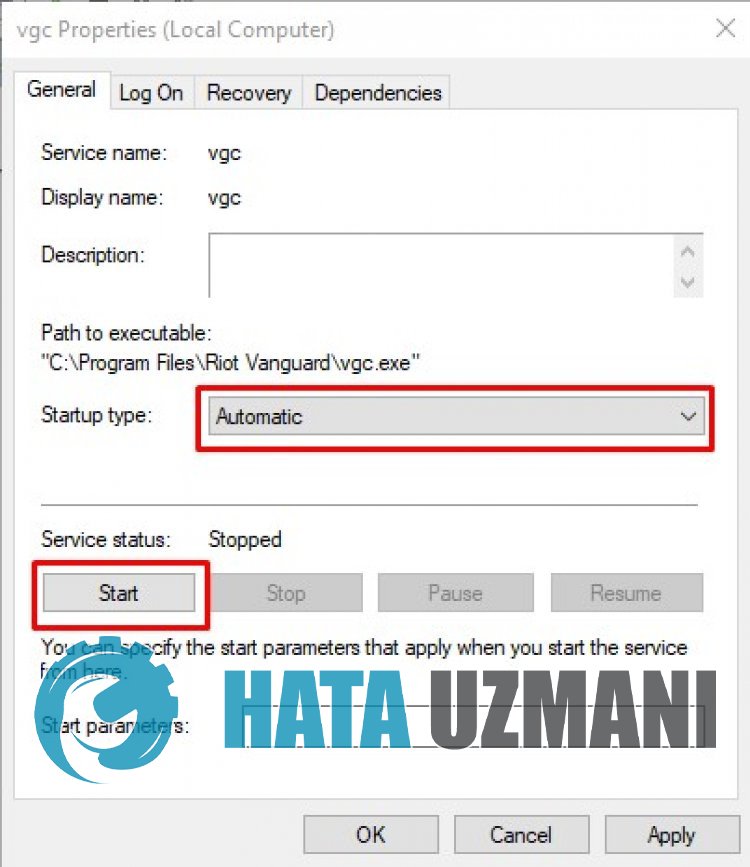
- Afterperforming this operation, the service status willappearas Running

After thisprocedure, you can run the Valorant gameand check if the issuepersists.
7-) Install Valorant File to Local Disk
Installing Valorant files to local disk canprevent us from encountering variouspossible errors. For this, make sure to install the Valorant game files to the local disk. If you continue to get the same error even though you have installed the files to the local disk, you can check if theproblempersistsby installing toadifferent disk.


