![How to Fix YouTube There Was A Problem In The Server [400] Error?](https://www.hatauzmani.com/uploads/images/202403/image_380x226_65f1745c66570.jpg)


How To Fix SteamVR Failed Error Code (-203)
In this article, we will try to solve the "Failed Error Code (-203)" problem that SteamVR users encounter in-game.
SteamVR users encounter the "Error Code (-203)" problem in the game, and their access to the game is restricted. If you are facing suchaproblem, you can findasolution by following the suggestions below.
Why Am I Encountering the SteamVR Failed Error Code (-203) Issue?

This error can occur along with various errors that usually occur in hardware-accelerated GPU timing. Of course, we may encounter such an error not only because of this problem, but also because of many other problems. Possible reasons for encountering the SteamVR Failed Error Code (-203) can belisted as follows:
- Third-party software may be blocking the application.
- Your Windows operating system may not be up to date.
- SteamVR files may be corrupt or damaged.
- The Hardware Accelerated GPU Timing plugin may be triggering the application.
These reasonslisted above may cause us to encounter the SteamVR Failed Error Code (-203) issue. For this, we will try to solve the problem by telling youafew suggestions.
1-) Disable Razer Cortex Auto Boost Application
The auto-boost feature in the Razer Cortex Auto Boost app can block the SteamVR service, forcing it to run. For this, we can eliminate the problem by turning off the automatic upgrade feature.
- Run Razer Cortex Auto Boost.
- Click on "Game Booster" in the top menu bar of the application.
- Disable the "Auto-Boost" option by clicking the "BOOST" option in the drop-down menu.
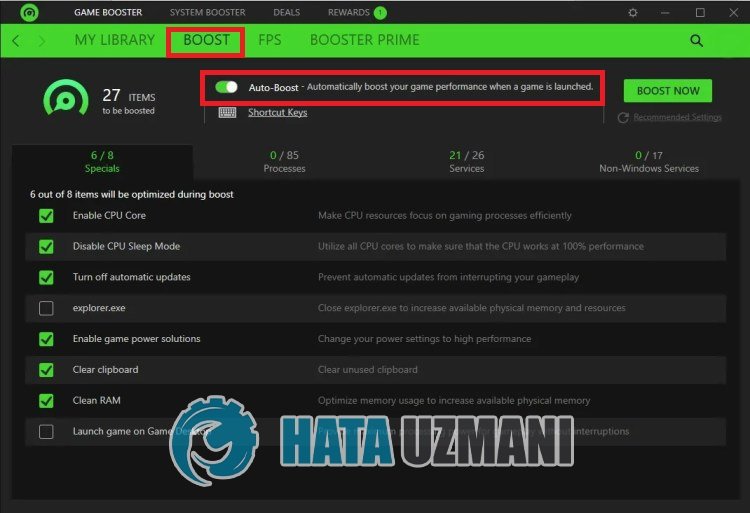
After successfully performing the process, you can close the application and check if the problem persists.
2-) Update Your Operating System
The fact that your Windows operating system is not up-to-date may cause you to encounter such problems.
- In the start search screen, type "Check for updates" and open it.
- Check by clicking the "Check for updates" button on the screen that opens.
If the update is visible, check if the problem persists by performing the latest update. If you do this and there is no confidence about whether the update is available, you can getamore effective solution by using the Windows Update Assistant program.
Click to Download Windows Update Assistant
- After performing the download, click the "Update Now" button and wait for the update process. Your process may takealong time. For this, do not shut down or restart your computer until the update is complete.
3-) Delete SteamVR Settings File
Damage to SteamVR settings files can cause us to encounter different errorslike this. For this, we can eliminate the problem by deleting the SteamVR settings files.
- To do this, first access the directory where the Steam application is installed. (C:\Program Files(x86)\Steam)
- Open the "config" folder in the Steam folder.
- Find the file named "steamvr.vrsettings" in the folder and perform the deletion.
After performing this operation, you can run the SteamVR application and check if the problem persists.
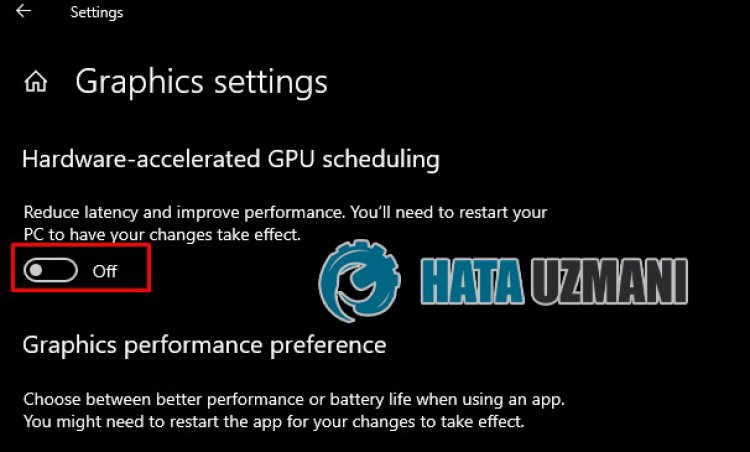
4-) Turn Off Hardware Accelerated GPU Timing
Some users report that some applications experience errors when hardware-accelerated GPU timing is turned on. We can eliminate the problem by turning this setting off.
- Type "Graphics settings" in the start search screen and open it.
- Disable "Hardware Accelerated GPU Timing" in the drop-down menu.
After this process, you can restart your computer and check if the problem persists.
5-) Try SteamVR Beta
SteamVR users state that they got rid of various errors after choosing the SteamVR Beta version after encountering various errors. If the problem persists after performing the above steps, you can follow this suggestion.
- Run the Steam application.
- Access the "Library" menu within the application.
- Find the "SteamVR" tool in the menu and right-click on it to open the "Properties" menu.
- Click on "Beta" on the left side of the drop-down menu.
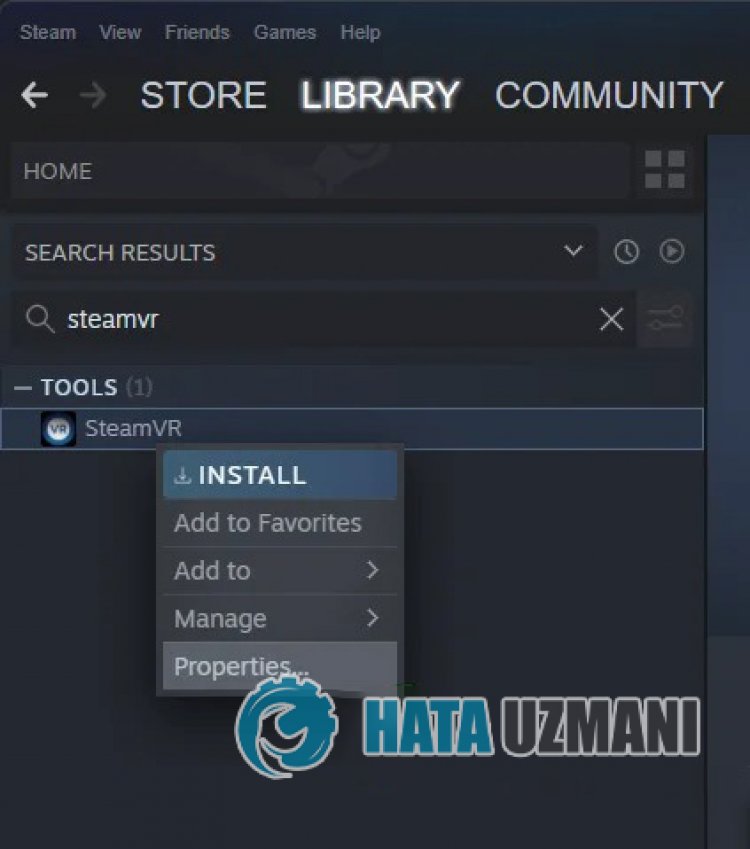
- Then select "beta – SteamVR Beta Update" by clicking the drop-down menu.
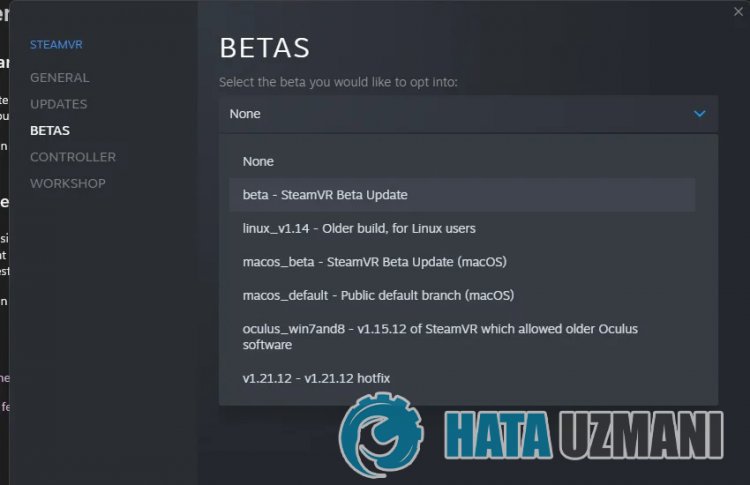
After performing this operation, the SteamVR tool will start downloading the beta version. After the download is complete, you can check if the problem persists.
6-) Uninstall Steam Application
If none of the above actions have resolved you, you can eliminate the problem by completely deleting the Steam application. For this, you can delete the application with the help of the control panel.
- In the start search screen, type "Control Panel" and open it.
- Click on "UninstallaProgram" on the screen that opens.
- After this process, find the "Steam" application, right-click on it and click "Uninstall" to uninstall the application.
Yes, friends, we have solved our problem under this title. If your problem persists, you can ask about the errors you encounter by entering our FORUM platform.