How To Fix Battle.net Waiting On Another Update Error
In this article, we will try to resolve the "Waiting On Another Update" error that Battle.net users encounter when they want to update their game.

Battle.net users are unable to update the game by encountering the error "Waiting On Another Update" when they want to update the game. If you are facing suchaproblem, you can findasolution by following the suggestions below.
- What is Battle.net Waiting On Another Update Error?
- How To Fix Battle.net Waiting On Another Update Error
What is Battle.net Waiting On Another Update Error?
Battle.net Waiting On Another Update error can occur due to many in-app problems and may occur to users.
Also, experiencinganetwork connection or regional problem can bring along such various errors.
Of course, you may encounter such an error not only because of this problem, but also because of many other problems.
So we're going to give youafew suggestions on how to fix the Battle.net Waiting On Another Update error.
How To Fix Battle.net Waiting On Another Update Error
This error is encountered when you want to update Overwatch 2, Hearthstone, Diablo and other games, causing the update process to not take place.
Therefore, we will give you suggestions on how to fix the error under this heading.
1-) Change Region
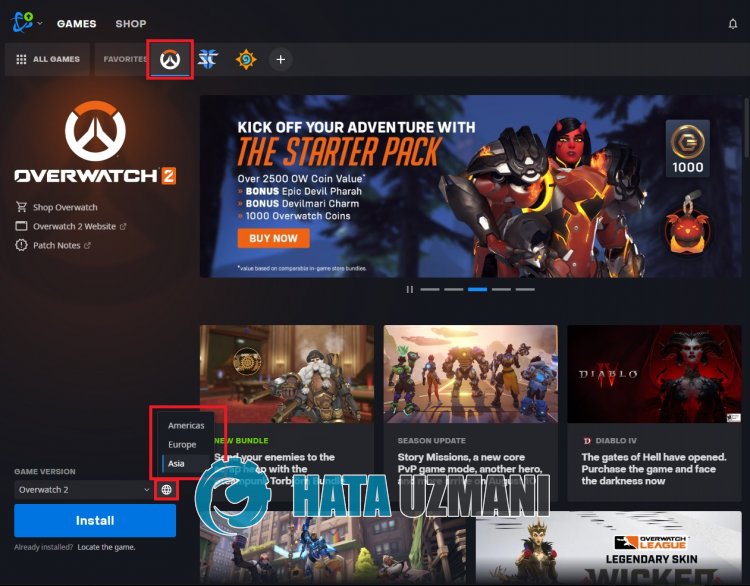
Battle.net offers three different regions for the game. These; America, Europe and Asia.
If the selected server is busy, it will cause problems with updates.
Therefore, you can check if the problem persists by enablingadifferent server than the selected one.
- Run the Battle.net application and select the game.
- Then select any server by clicking the Globe icon.

After this process, you can check if the problem persists.
2-) Check Download Bandwidth
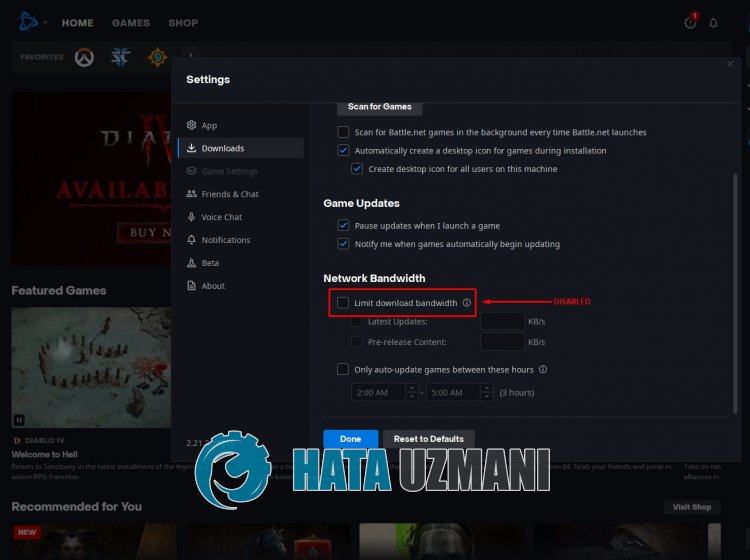
Since the Limit download bandwidth option in the Battle.net application is enabled by default, it can reduce the internet speed bylimiting some downloads.
Therefore, you can eliminate the problem by disabling the "Limit download bandwidth" option.
- Run the Battle.net application.
- Then click the Battle.net logo in the upper left and click "Settings".
- Click "Downloads" on the left side of the window that opens.
- Then disable the "Limit download bandwidth" option and click the "Done" button.

After this process, you can continue the update and check if the problem persists.
3-) Check Your Connection
The problem with the internet connection can cause many errors. If your internet connection is slowing down or disconnected, let's giveafew suggestions to fix it.
- If your internet speed is slowing down, turn your modem off and then on again. This process will relieve your internet alittle bit.
- We can eliminate the problem by clearing the Internet cache.
Clear DNS Cache
- Type "cmd" in the start search screen and run it as administrator.
- Command prompt screen by typing the followinglines of code one after the other and press enter.
- ipconfig /flushdns
- netsh int ipv4 reset
- netsh int ipv6 reset
- netsh winhttp reset proxy
- netsh winsock reset
- ipconfig /release
- ipconfig /renew
- ipconfig /registerdns
- netsh interface tcp reset
- netsh int ip reset
- netsh int tcp set global autotuninglevel=normal
- After this operation, it will show that your dns cache and proxies have been cleared successfully.
After this process, restart the computer and run the Battle.net program and check if the problem persists. If the problem persists, let's move on to another suggestion.
4-) Close Unnecessary Applications
Some unnecessary 3rd party applications running in the background may cause you to encounter download problems.
For this reason, close and control 3rd party applications running in the background with the help ofatask manager.
5-) Use VPN
We can makeavpn connection for the Battle.net server change to take place.
Therefore, you can eliminate the problem by using the Hotspot Shield VPN application available in the Microsoft Store.
You can download the Hotspot Shield VPN application from the Microsoft Store by accessing thelink below.
Click to Install Hotspot Shield VPN
After installing the application, perform the connection process and check if the problem persists.
6-) Run as Administrator
The fact that the application does not run with administrator rights may cause us to encounter various errorslike this.
For this, close the Battle.net program completely and run it as an administrator and check if the problem persists.
7-) Turn off Antivirus
Disable any antivirus program you use, or delete it completely from your computer. If you are using Windows Defender, disable it. For this;
- Open the start search screen.
- Open the search screen by typing "Windows security settings".
- Click on "Virus and Threat Protection" on the screen that opens.
- Click on "Ransomware Protection" in the menu.
- Turn off "Controlled Folder Access" on the screen that opens.
After this, let's turn off real-time protection.
- Type "virus and threat protection" into the start search screen and open it.
- Then click on "Manage settings".
- Turn Real-time protection to "Off".
After performing this operation, we will need to add the Battle.net folder as an exception.
- Type "virus and threat protection" into the start search screen and open it. Under
- Virus and threat protection settings, select Manage settings, and then under Exclusions Exclude select add or remove.
- Select Add an exclusion, and then select the Battle.net folder saved to your disk.
After this process, run Battle.net and check if the problem persists.
![How to Fix YouTube There Was A Problem In The Server [400] Error?](https://www.hatauzmani.com/uploads/images/202403/image_380x226_65f1745c66570.jpg)


