![How to Fix YouTube There Was A Problem In The Server [400] Error?](https://www.hatauzmani.com/uploads/images/202403/image_380x226_65f1745c66570.jpg)


Fix: Windows 11 Version 22H2 Not Installing Error Code 0x80888002
In this article, we will try to solve the "Error Code: 0x80888002" problem that Windows 11 users encounter when they want to update version 22H2.
Windows 11 users cannot perform the update request by encountering the error "0x80888002" while requesting the update. If you are facing suchaproblem, you can findasolution by following the suggestions below.
What is Windows 11 Version 22H2 Update Error 0x80888002?

Although this error may seem silly, it turns out that the update process failed with the Microsoft IPP Class Driver installed on your computer. For this, we can eliminate the problem by removing the printer on your system where the Microsoft IPP Class Driver is installed. For this, we will try to solve the problem by telling youafew suggestions.
How To Fix Windows 11 Version 22H2 Update Error 0x80888002
To fix this error, you can find the solution to the problem by following the suggestions below.
1-) Uninstall Microsoft IPP Class Driver
As we said above, we may be encountering such an error with the Microsoft IPP Class Driver installed on your computer. For this, we can eliminate the problem by removing the printer on your system where the Microsoft IPP Class Driver is installed. For this, let's first check whether the printer connected to your computer matches the Microsoft IPP Class Driver or whether it is installed.
- Open the Settings menu.
- Click on "Bluetooth and Devices" on the left.
- Then click "Printers and Scanners" and click the printer connected to your computer.
- After this process, let's continue the process by selecting "Yburner Properties".
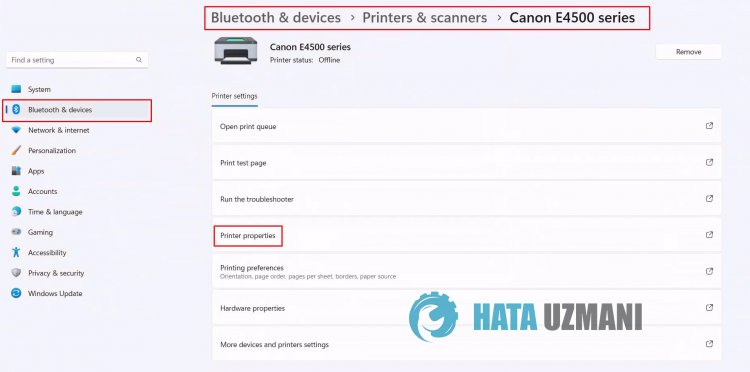
I have left the additional image above so that you can better understand this explanation.
- Click on "Advanced" in the new window that appears, expand "Driver" and check if "Microsoft IPP Class Driver" is available .
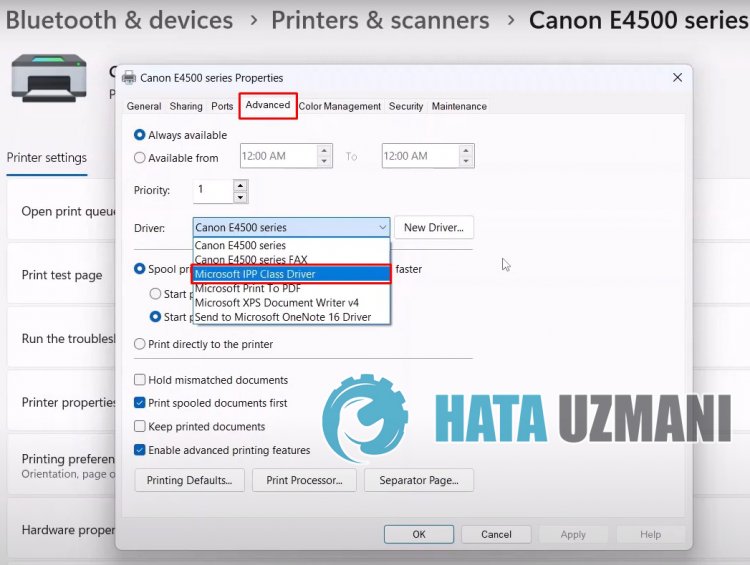
As we have shown above, if the driver is registered on your printer, you can delete it or wait for Windows to resolve this error withanew update. If you want to eliminate the problem by deleting your printer, let's continue.
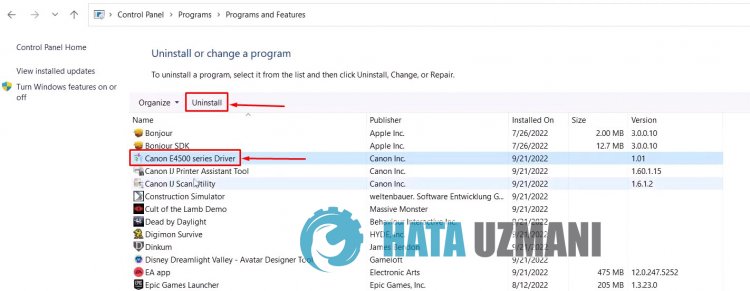
- Open the control panel.
- Click on the "Programs" option on the screen that opens.
- After this process, click "UninstallaProgram".
- Then perform the uninstall by selecting the printer driver you want to delete.
After this process, you can restart your computer and check if the problem persists.
2-) Use Windows Update Assistant Application
The Windows Update Assistant program, developed by Windows, can help solve any problem we encounter. If you say that you get the error 0x80888002 when updating Windows, you can get help by downloading the Windows Update Assistant program.
Click to Download Windows Update Assistant
- After performing the download, click the "Update Now" button and wait for the update process. Your process may takealong time. For this, do not shut down or restart your computer until the update is complete.
3-) Turn Windows Update Off and On
If the problem persists, we can fix this problem by turning Windows update off and on. For this, we will perform the operation with the help of aline of code.
- We write "cmd" in the start search screen and run it as administrator.
- We write "sc delete wuauserv" in the command prompt that opens and press enter.
With this process, we have closed the Windows update. In our next action, we will turn on Windows update again.
- Open command prompt again as administrator and display "sc create wuauserv DisplayName= "Windows Update" binpath= "C:\WINDOWS\system32\svchost.exe -k netsvcs -p" Start= delayed-auto depend= RpcSs " paste the code.
After this process, we have reinstalled the Windows update service. Next, we will need to start the Windows update service.
- We write "Services" on the start search screen and open it.
- Double-click on the "Windows Update" service on the screen that opens.
- Set the Startup type to "Automatic" on the screen we are facing.
- Then we run the service by clicking the "Start" button below.
4-) Delete Update Files
During the Windows update process, missing or damaged files in the folder stored as an archive can cause any problem. For this, we can perform the reinstallation process by completely deleting these saved files.
- Access the file location I'll leave behind. C:\Windows\SoftwareDistribution\Download
- The folders will belisted on the screen that opens. These folders are the files archived during the update process, by deleting these files completely, we empty the recycle bin.
5-) Delete Cookie Files
Windows performs its operations by hostingatemporary folder to keep applications running in the background. Failure of any of these temporary files to work can cause such problems. For this, we may need to delete temporary files and empty them from the recycle bin.
- We write %temp% on the start search screen and open it.
- Empty the recycle bin by deleting all files on the screen that opens.
After this process, the temporary files will be deleted, the load on the computer will decrease and various problems will disappear.
6-) Fix Windows Errors
The files in Windows are damaged or corrupted, which can lead to various errors. For this, we will share two code blocks with you and try to scan and repair damaged or corrupted files.
Do an SFC Scan
Damaged or corrupted files that occur in Windows files can cause many error codes. For this, we will tell youafew ways to solve the problem.
- Type "cmd" in the start search screen and run as administrator.
- Type "sfc /scannow" into the command prompt that opens and press enter.
After this process, corrupted or damaged files will be scanned and corrections will be made. Do not shut down or restart your computer until the process is complete. After this process, let's perform another suggestion.
DoaDISM Scan
- Type "cmd" in the start search screen and run as administrator.
- Type the following commands in the command prompt screen that opens and press enter.
- Dism /Online /Cleanup-Image /CheckHealth
- Dism /Online /Cleanup-Image /ScanHealth
- Dism /Online /Cleanup-Image /RestoreHealth
After the process is completed successfully, you can restart your computer and check if the problem persists.
Yes, friends, we have solved our problem under this title. If your problem persists, you can ask about the errors you encounter by entering our FORUM platform.