![How to Fix YouTube There Was A Problem In The Server [400] Error?](https://www.hatauzmani.com/uploads/images/202403/image_380x226_65f1745c66570.jpg)


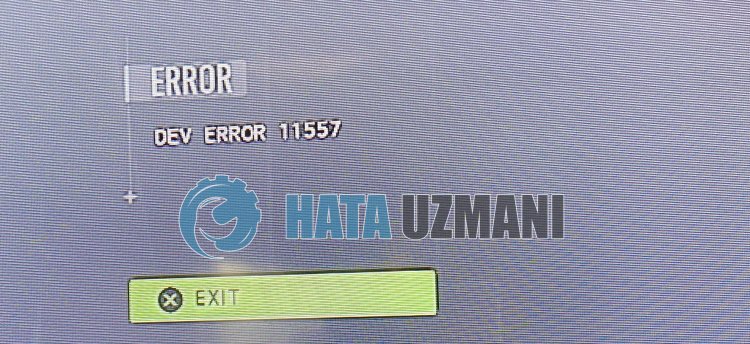
Fix: Call of Duty Warzone 2.0 Dev Error 11557
In this article, we will try to solve the "Dev Error 11557" problem that Call of Duty Warzone 2.0 players encounter in the game.

Call of Duty Warzone 2.0 players encounter the "Dev Error 11557" error in the game, and their access to the game is restricted. If you are facing suchaproblem, you can findasolution by following the suggestions below.
What is Call of Duty Warzone 2.0 Dev Error 11557?
This error is usually caused by the graphics card driver being out of date or not working properly. For this, we will try to eliminate the problem by telling youafew suggestions.
How To Fix Call of Duty Warzone 2.0 Dev Error 11557
To fix this error, you can find the solution to the problem by following the suggestions below.
1-) Keep Graphics Card Updated
You need to check if you are using the latest version of your graphics card driver. We can eliminate the problem by checking if our graphics card driver is up to date.
If you have an Nvidia graphics card Geforce Experience check for updates.
If you have an Amd graphics card Radeon Software check for updates.
After updating our graphics driver and restarting our computer, we can try to open the Call of Duty Warzone 2.0 game.
2-) Set the Game's Graphics Preference
We can fix the problem by setting the graphics preference setting of the Warzone 2.0 game to "High Performance".
- Type "Graphics Settings" into the start search screen and open it.
- Disable the "Hardware Accelerated GPU Timing" option on the screen that opens.
- Then find and select the launcher of the game "cod.exe" by clicking "Browse" below.
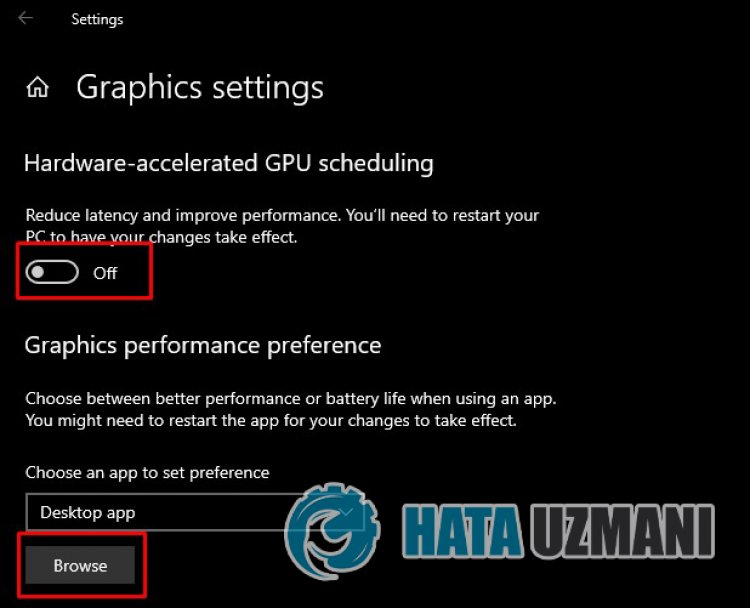
- After your game is added as an option, click "Warzone 2.0", click "Options" and set it to "High Performance" to save the action.
After this process, you can run the game and check if the problem persists.
3-) Enable NVIDIA Image Scaling
We can fix the problem by enabling image scaling for Warzone 2 by opening the Nvidia Control Panel.
- Open the Nvidia Control Panel.
- Click on "Manage 3D Settings" on the left.
- Then click "Program Settings" and click the "Add" button.
- Select and add the game "Call of Duty HQ" in the new window that opens.
- Click on the "Image Scaling" option on the screen that opens, set it to "On" and set the "Sharpening" option to "100 strong>".
After this process, you can save the processes and check if the problem persists.
4-) Delete Activision and Recording Folder
Warzone 2 game data is read by backing up to Activision and save folder. If the files in the Activision folder are damaged, you may encounter various problemslike this. For this, you can check if the problem persists by deleting the Activision folder.
- Type "Run" into the start search screen and open it.
- Type "%localappdata%" on the screen that opens and press enter.
- After this process, select the "Activision" folder and perform the deletion.
After deleting the folder, we can eliminate the problem by deleting the save file of the game.
- Type "Run" in the start search screen and open it.
- Type the followingline on the screen that opens and press enter. "%UserProfile%\Documents\"
- After this, delete the "Call of Duty" folder and check if the problem persists.
5-) Verify File Integrity of Game
Damage to the game file can cause you to encounter various errorslike this. For this, we can eliminate the problem by verifying the game files.
If you areaBattle.Net user:
- Run the Battle.Net application.
- Click on "Games" at the top of the app.
- Click on the game Warzone 2.0.
- Click the gear icon next to the "Play" button on the screen that opens.
- After this process, click "Scan and Repair" to start the verification process.
If you areaSteam user:
- Open the Steam program.
- Open thelibrary menu.
- Right click on the "Warzone 2.0" game on the left and open the "Properties" tab.
- Open the "Local Files" menu on the left side of the screen that opens.
- Click the "Verify integrity of game files" button in the Local Files menu we encountered.
After this process, the download will be performed by scanning the damaged game files. After the process is finished, try to open the game again.
Yes, friends, we have solved our problem under this title. If your problem persists, you can ask about the errors you encounter by entering our FORUM platform.


