![How to Fix YouTube There Was A Problem In The Server [400] Error?](https://www.hatauzmani.com/uploads/images/202403/image_380x226_65f1745c66570.jpg)


Fix: Call of Duty Modern Warfare II Voice Chat Not Working
In this article, we will try to solve the "voice chat not working", "microphone not working" problem that Call of Duty Modern Warfare II players encounter in-game.

Call of Duty Modern Warfare II players are faced with "voice chat not working>", "microphone not working", and their access to the game is restricted. If you are facing suchaproblem, you can findasolution by following the suggestions below.
Why Call of Duty Modern Warfare II Voice Chat/Mic Not Working?
It observes that when Call of Duty Modern Warfare II players want to talk to the team via voice chat during the game, the microphone does not work and the voice is not transmitted to the other party.
This problem is usually caused by the in-game voice chat device setting not being configured. Of course, we may encounter such an error not only because of this problem, but also because of many other problems. For this, we will try to solve the problem by telling youafew suggestions.
How to Fix Call of Duty Modern Warfare II Voice Chat/Microphone Not Working Issue
To fix this error, you can find the solution to the problem by following the suggestions below.
1-) Set In-Game Voice Chat Device
Failure to configure in-game voice chat device may cause voice chat or microphone in-team voice chat not working. For this, we can fix the problem by setting the in-game flood chat device.
- First of all, let's go to the in-game settings menu and click on the "Audio" option.
- Select the "Voice Chat Device" option in the Sound menu instead of "Defaul System Device" and save the device of your inserted microphone.
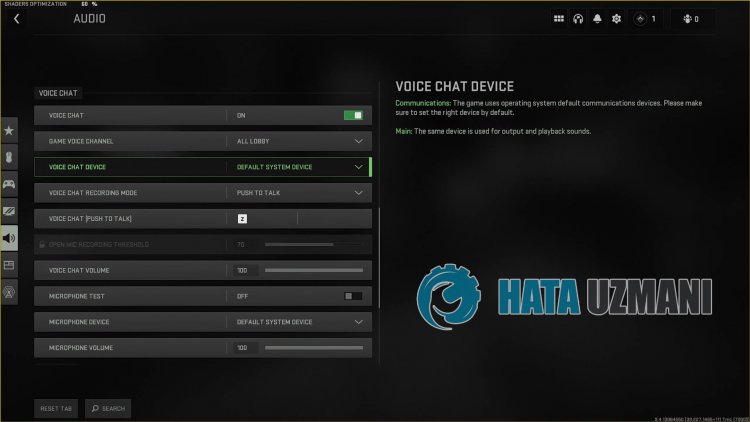
After this process, you can check if the problem persists.
2-) Update Your Operating System
Outdated operating system can cause device drivers to be out of date and some device drivers to not work. For this, you can check if the problem persists by updating the Windows operating system.
- Let's open the start search screen by typing "Check for updates".
- Start the update check by clicking the "Check for updates" button on the screen that opens.
Ifanew update is available, you can check if the problem persists by performing the update process.
3-) Update Audio Driver
Outdated sound driver can cause you to encounter various sound problemslike this. For this, we can eliminate the problem by keeping the sound driver updated.
- In the start search screen, type "Device Manager" and open it.
- Expand "Audio inputs and outputs" in the window that opens.
- After this process, right-click on your microphone driver and click "Update driver".
- Click on "Search for drivers automatically" in the new window that opens.
After this process, Windows will automatically search for drivers and perform the update process. If your driver is up to date, let's move on to our other suggestion.
4-) Set from Realtek Audio Console Application
We can eliminate the problem by changing the analog option to microphone via the Realtek Audio Console application.
- In the start search screen, type "Realtek Audio Console" and open it.
- Click on "Device advanced settings" in the lower left corner of the screen that opens.
- After this process, select your microphone device by clicking the drop-down menu under the "Analog" heading.
After performing this operation, you can check if the problem persists.
5-) Wrong Device May Be Set As Default
Setting the wrong device as default may cause the microphone not to work. For this, we need to setacorrect device as default and check if the problem persists.
- In the start search screen, type "Control Panel" and open it.
- Click on the "Hardware and Sound" option on the screen that opens and access the "Sound" menu.
- After this, right-click on the device we want to enable by disabling the wrongly set default device and click "Set as default device".
After setting it to default, you can check if the problem persists.
6-) Check Microphone Privacy Setting
Disabling the "Allow desktop apps to access your microphone" option in the microphone privacy setting may cause you to encounter various microphone problemslike this.
- Let's type "Microphone privacy settings" in the start search screen and open it.
- Enable the "Allow desktop applications to access your microphone" option in the new window that opens, if it is disabled.
After the activation process is successful, you can check if the problem persists.
Yes, friends, we have solved our problem under this title. If your problem persists, you can ask about the errors you encounter by entering our FORUM platform that we have opened.

