![How to Fix YouTube There Was A Problem In The Server [400] Error?](https://www.hatauzmani.com/uploads/images/202403/image_380x226_65f1745c66570.jpg)


Fix: Battlefield 2042 Matchmaking Failed Error
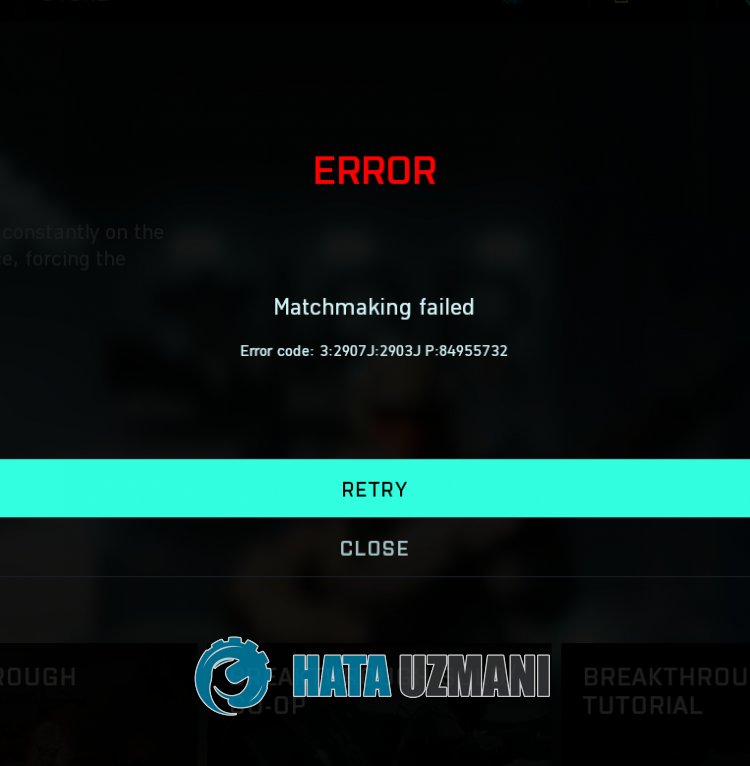
In this article, we will try to resolve the "Matchmaking Failed. Error Code: 3:2907J:2903JP:84955732" error that Battlefield 2042 players encounter when trying to join the match.
Battlefield 2042 players, while trying to join the match, encounter the error "Matchmaking Failed. Error Code: 3:2907J:2903JP:84955732" and cannot perform the matching process. If you are facing suchaproblem, you can findasolution by following the suggestions below.
What is Battlefield 2042 Matchmaking Failed?
 /p>
/p>
This error usually occurs when trying to connect to the Breakthrough game. One of the possible reasons for this error is that it occurs when the servers are busy, and it appears to users. Of course, we may encounter such an error not only because of this problem, but also because of many other problems. For this, you can reach the solution of the problem by telling youafew suggestions.
How To Fix Battlefield 2042 Matchmaking Failed Error
To fix this error, you can find the solution to the problem by following the suggestions below.
1-) Reconnect
If you encounter such an error at first, the first thing we need to do is click on the "Close" option and makeanormal match request to check if the problem persists. If your problem persists, you can move on to the next suggestion.
2-) Register Another DNS Server
We can eliminate the problem by registering another dns server on the computer.
- Open Control Panel and select Network and Internet
- Open Network and Sharing Center on the screen that opens.
- Click on Change adapter settings on the left.
- Right-click on your Connection Type to open the Properties menu.
- Double-click Internet Protocol Version 4 (TCP /IPv4).
- Let's apply the settings by typing the Google DNS server we will give below.
- Preferred DNS server: 8.8.8.8
- Other DNS server: 8.8.4.4
- Then click on Verify settings on exit option and press OK button to perform the actions.
After doing this, let's move on to the next suggestion.
3-) Check Your Connection
The problem with the internet connection can cause many errors. If your internet connection is slowing down or disconnected, let's giveafew suggestions to fix it.
- If your internet speed is slowing down, turn your modem off and then on again. This process will relieve your internet alittle bit.
- We can eliminate the problem by clearing the Internet cache.
Clear DNS Cache
- Type "cmd" in the start search screen and run it as administrator.
- Command prompt screen by typing the followinglines of code one after the other and press enter.
- ipconfig /flushdns
- netsh int ipv4 reset
- netsh int ipv6 reset
- netsh winhttp reset proxy
- netsh winsock reset
- ipconfig /release
- ipconfig /renew
- ipconfig /registerdns
- netsh interface tcp reset
- netsh int ip reset
- netsh int tcp set global autotuninglevel=normal
- After this operation, it will show that your dns cache and proxies have been cleared successfully.
After this process, restart the computer and run Steam or EA Desktop and check if the problem persists. If the problem persists, let's move on to another suggestion.
4-) Run as Administrator
The fact that Steam or EA Desktop application does not run with administrator rights can cause us to encounter various connection errorslike this. For this, we can check whether the problem persists by running the Steam or EA Desktop application as an administrator and opening the game.
5-) CreateaPrivate Port for Battlefield 2042
If none of the above suggestions work for you, we can fix the problem by setting the port configured for Battlefield 2042.
- In the start search screen, type "Windows Defender Firewall" and open it.
- Click on "Advanced Settings" on the left side of the screen that opens.
- Click on the "Inbound Rules" option on the left side of the window that opens and click on the "New Rule" option on the right.
- Choose the "Port" option in the new window that opens and click the "Next" button.
- After this process, select the "TCP" option and type the port we will leave below in the box and click the "Next" button.
- 5222, 9988, 17502, 20000-20100, 22990, 42127
- Then select the "Allow Connection" option, press the "Next" button, set three options as selected and click the "Next" button .
- Then, give the name of the port where we performed the installation process and press the "Finish" button.
In this process, we have addedanew rule to the TCP port. In our next action, let's end our process by connecting the UDP port.
- Then add the new rule again and select "Port" and click the "Next" button.
- After this process, select the "UDP" option and type the port we will leave below in the box and click the "Next" button.
- 3659, 14000-14016, 22990-23006, 25200-25300
- Then select the "Allow Connection" option, press the "Next" button, set three options as selected and click the "Next" button .
- Then, give the name of the port where we performed the installation process and press the "Finish" button.
After this process, run Battlefield 2042 to see if the issue persists.
Yes, friends, we have solved our problem under this title. If your problem persists, you can ask about the errors you encounter by entering our FORUM platform.